

Updated:
Originally Published:
In the utility and substation design industry, working with vendor-supplied 3D models is a common task—but one that often causes frustration. These files typically arrive in obscure formats, packed with too much detail, and more often slow projects down than help move them forward. But what if you could turn those 3D models into smart, usable Revit families in under ten minutes—no plug-ins, no special software, no IT approvals required?
The workflow outlined below helps utility and substation design teams do just that: turning dense, vendor-provided models into clean, coordinated, project-ready Revit content.
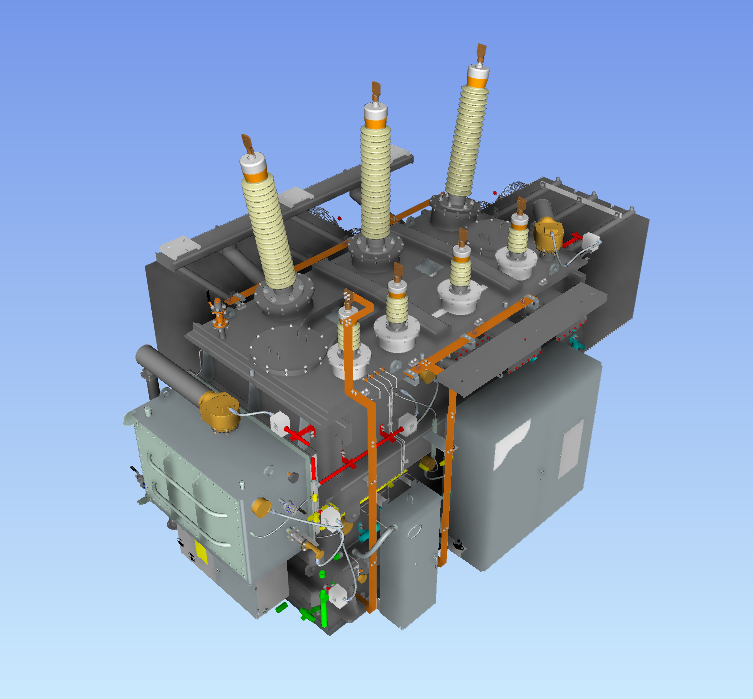
Vendor models, like transformers, buildings, or insulators, are essential for accurate 3D coordination. They’re often full of intricate details, which can feel overwhelming at first, but also give teams the flexibility to simplify or adapt them based on project needs.
The real challenge? Getting those models into a format that works inside Revit quickly and without headaches.
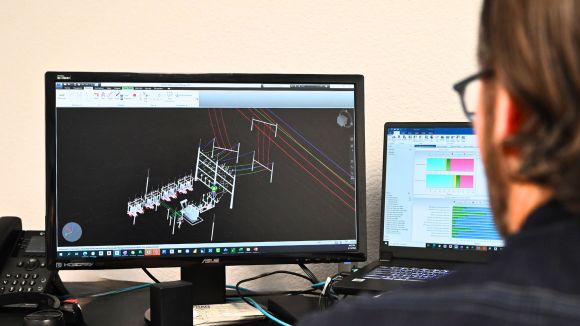
Step 1: ging the vendor model into Autodesk Inventor. Most file types—.stp, .iges, and more—can be handled using Inventor’s built-in import tools. These files typically come in as solid bodies. During import, you can convert units or apply naming conventions if needed. This step typically takes just a few minutes, even on mid-range hardware.
Step 2: Use Inventor’s “Export Building Components” feature under the BIM Content tab. This creates a Revit family (.rfa) file that can be inserted directly into your project. The export process is quick and generates a report summarizing the conversion.
Once in Revit, you can assign the model to a specific family category—like Electrical Equipment—and enhance it with project-specific parameters. These might include:
This transforms the model from a static object into a smart component that can be used for scheduling, documentation, and coordination workflows.
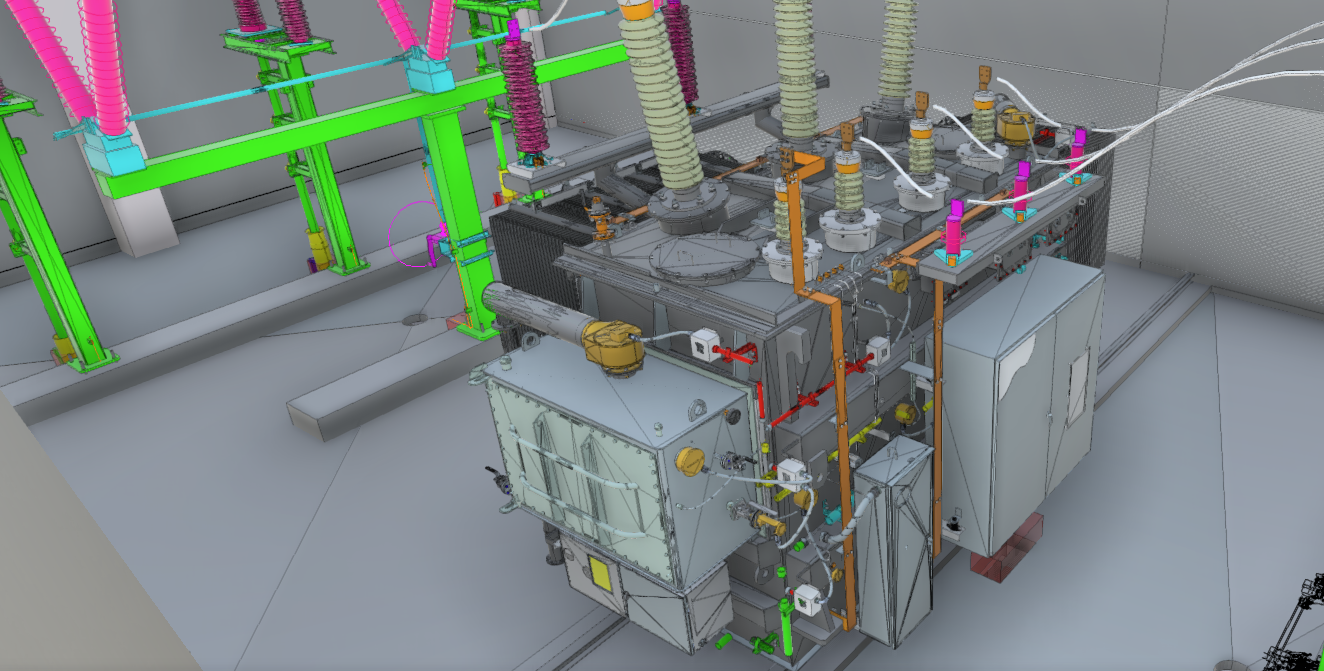
This workflow has been used successfully on substation projects where teams had to combine models from Pro/E, MicroStation, and Revit into a single coordinated environment. In one case, a transformer model originally created in Pro/E was imported into Inventor, exported to Revit, and integrated into a Navisworks model alongside architectural and structural elements. The result: better alignment of conduit runs, mounting systems, and equipment footprints—with fewer clashes and less rework.
While this workflow is highly effective, there are a few potential limitations to keep in mind:
Still, with thoughtful use, this workflow can drastically reduce time spent reworking or recreating vendor and project-ready models—improving design coordination and helping teams deliver with confidence.
Converting vendor models doesn’t have to be a bottleneck. With the right approach, you can transform even the most complex files into lightweight, usable Revit content in minutes. This workflow helps team bridge the gap between raw data and construction-ready models, boosting efficiency without sacrificing accuracy.
Beta Engineering is a substation EPC company with headquarters in Pineville, Louisiana, and an office in San Diego. Since 1975, we’ve delivered high-voltage substation and transmission line projects for power delivery companies across the U.S. Contact our team to leverage our 50 years of problem-solving experience and deliver reliable, long-term results.
Updated:
August 7, 2025
Updated:
Originally Published:
In the utility and substation design industry, working with vendor-supplied 3D models is a common task—but one that often causes frustration. These files typically arrive in obscure formats, packed with too much detail, and more often slow projects down than help move them forward. But what if you could turn those 3D models into smart, usable Revit families in under ten minutes—no plug-ins, no special software, no IT approvals required?
The workflow outlined below helps utility and substation design teams do just that: turning dense, vendor-provided models into clean, coordinated, project-ready Revit content.
Vendor models, like transformers, buildings, or insulators, are essential for accurate 3D coordination. They’re often full of intricate details, which can feel overwhelming at first, but also give teams the flexibility to simplify or adapt them based on project needs.
The real challenge? Getting those models into a format that works inside Revit quickly and without headaches.
Step 1: ging the vendor model into Autodesk Inventor. Most file types—.stp, .iges, and more—can be handled using Inventor’s built-in import tools. These files typically come in as solid bodies. During import, you can convert units or apply naming conventions if needed. This step typically takes just a few minutes, even on mid-range hardware.
Step 2: Use Inventor’s “Export Building Components” feature under the BIM Content tab. This creates a Revit family (.rfa) file that can be inserted directly into your project. The export process is quick and generates a report summarizing the conversion.
Once in Revit, you can assign the model to a specific family category—like Electrical Equipment—and enhance it with project-specific parameters. These might include:
This transforms the model from a static object into a smart component that can be used for scheduling, documentation, and coordination workflows.
This workflow has been used successfully on substation projects where teams had to combine models from Pro/E, MicroStation, and Revit into a single coordinated environment. In one case, a transformer model originally created in Pro/E was imported into Inventor, exported to Revit, and integrated into a Navisworks model alongside architectural and structural elements. The result: better alignment of conduit runs, mounting systems, and equipment footprints—with fewer clashes and less rework.
While this workflow is highly effective, there are a few potential limitations to keep in mind:
Still, with thoughtful use, this workflow can drastically reduce time spent reworking or recreating vendor and project-ready models—improving design coordination and helping teams deliver with confidence.
Converting vendor models doesn’t have to be a bottleneck. With the right approach, you can transform even the most complex files into lightweight, usable Revit content in minutes. This workflow helps team bridge the gap between raw data and construction-ready models, boosting efficiency without sacrificing accuracy.
Beta Engineering is a substation EPC company with headquarters in Pineville, Louisiana, and an office in San Diego. Since 1975, we’ve delivered high-voltage substation and transmission line projects for power delivery companies across the U.S. Contact our team to leverage our 50 years of problem-solving experience and deliver reliable, long-term results.
Related Services:


